前言
這陣子在做 IoT 設備資安檢測的時候發現受測設備的設定檔是 Protobuf 的序列化格式,剛好先前在 使用 protobuf inspector 分析未知結構緩衝資料 一文中介紹了如何對未知結構的 Protobuf 進行分析,今天我們就來把分析結果轉成可用的程式吧!
文中的設定檔非當事設定檔,是依照概念與所發現的真實問題重新設計的檔案。
你可以在 Github – protobuf-analysis-sample 下載到本文用到的檔案。
0x00 使用 Protobuf inspector 分析資料格式
先照著 使用 protobuf inspector 分析未知結構緩衝資料 的說明對資料進行初步分析,可以發現結構意外單純。
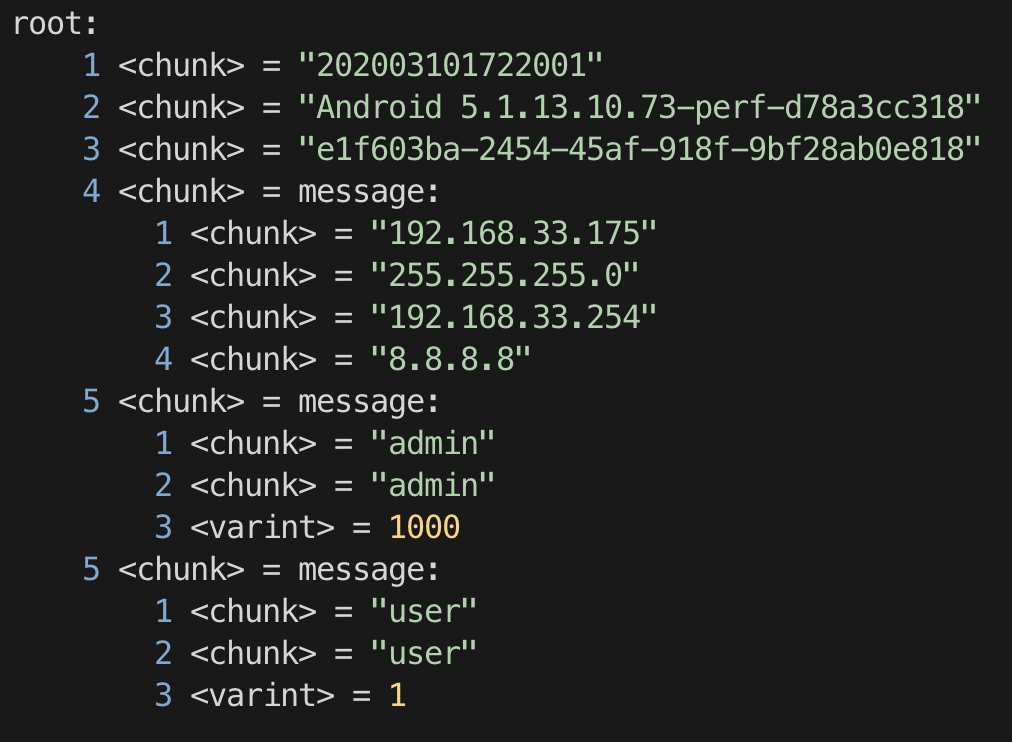
透過上圖結果,我們可以觀察到以下資訊
- 1: 設定檔案的編號
- 2: 韌體版本
- 3: 硬體序號
- 4: 網路設定
- 5: 使用者帳號
項目 4,5 後方寫著 <chunk> = message: ,代表這兩個項目是指向另一個 message 封裝(可以把它當作另外一個物件看待)
0x01 安裝 Protobuf 編譯環境
這邊不再贅述,請參閱 在 macOS上安裝 Protobuf 編譯環境
0x02 重建 protobuf 結構描述檔
0x02.1 打地基
根據 步驟 0x00 的分析結果,我們大致上知道這個設定檔存在三個 Message,一個是根結構,兩個參考結構(網路設定/使用者帳號)
因此一開始我們可以先把基本架構蓋出來
File: config.proto
syntax = "proto2";

message NetworkSetting {
}

message Account {
}

message Config {
}
0x02.2 放入變數
message NetworkSetting {
    required string ip = 1;
    required string mask = 2;
    required string gateway = 3;
    required string dns1 = 4;
    optional string dns2 = 5;     # 在 0x00 的分析中並沒有這個項目,因為他是可選的,只有在設備設定了 DNS 2 後才會出現
}

message Account {
    required string username = 1;
    required string password = 2;
    required int32 level = 3;
}

message Config {      #這是我們的根結構
    required string config_version = 1;
    required string firmware_version = 2;
    required string device_identification = 3;
    required NetworkSetting network_setting = 4;
    repeated Account accounts = 5;      # 從 0x00 的分析中觀察到 項目 5 有複數個,因此設定為 repeated(陣列)
}
0x03 編譯 .proto 結構描述檔
完成描述檔後,便可以使用 protoc 將 .proto 轉換為我們想要使用的語言
編譯方法如下:
keniver@MacBook-Pro ~ $ protoc -I=`pwd` --python_out=`pwd` `pwd`/config.proto
#  --python_out 是因為我要編給 Python 使用,你也可以編譯給其他程式語言使用
編譯後會生成 檔案名稱_pb2.py 的檔案,這是供我們引入 Python 使用的物件
0x04 讀取 Protobuf 檔案
成功編譯 .proto 後,我們只需要在 Python 中引入編譯後的物件,就可以開始讀取 protobuf 的緩衝檔案
File: config_reader.py
import config_pb2   # 步驟 0x03 編譯後產生的物件

config = config_pb2.Config() #   在定義結構的階段,我們將 Config 定為根結構,故此處呼叫 Config 物件

with open("exported1.config") as f:
    config.ParseFromString(f.read())  # 將讀進來的檔案轉換為物件
接著我們就可以依照我們的需求對檔案進行讀取
File: config_reader.py
print( config.accounts[0].username, config.accounts[0].password )
# 輸出為: admin admin
print( config.accounts[1].username, config.accounts[1].password )
# 輸出為: user user
請不要使用明文儲存使用者密碼,請用 Hash